2011 Hobie Red Revo 13
Here's a blue cat that Martin (Moc) caught today at Mattawoman Creek, MD. Got himself a nice catfish dinner.
Pages
▼
Saturday, March 31, 2012
Wednesday, March 28, 2012
Picture of the Day - 2/28/12 - Rob Choi's Photo Skills
Check out Rob Choi's awesome photo of the sunset at CBBT, Virginia Beach. Also, check out his blog he has some great tips and info!!
Monday, March 26, 2012
Product Review Part 1: Yak Attack GunnAll Skin
I was super excited when I heard the news that Yak Attack, the leader in kayak accessory engineering, would be producing a product for Hull Protection. I had been thinking over a lot of ideas when I had my 1st Pro Angler for what would be good to protect my investment. We had a thread on Maryland Kayak Fishing Forum and on the Hobie Forum with ideas that everyone could think of.
I had thought of something similar to what Yak Attack ending up creating, but I never took it seriously when it crossed my mind. My thought was to use a rubber door mat, cut it accordingly and attach to the sides of the kayak (oh well). What I ended up using on my last kayak was Stainless Steel Diamond Plating at the front and back corners of the kayak.
Well thanks to Yak Attack we now have GunnAll Skin.
I believe this product is going to be a game changer when it comes to kayak hull protection. Fishing in a kayak gives you the advantages of fishing in contact with all kinds of structure, which is a plus, but when you beat the hell out of your yak grinding up against the structure which 90% of time has barnacles and/or jagged concrete it could cost you to have to get a new kayak due to a small crack or leak in the hull.
The GunnAll Skin comes 3 foot sections with a number of widths to choose from. I chose to purchase six 6" three foot sections, thinking I could cut the pieces in half if I felt necessary (which was a simple as cutting with household scissors). It is a hard smooth, rubber like product.
For the installation it was super easy.
1. Prep the area with alcohol to clean it.
2. Unpeel the paper of the back of the rubber material.
3. Place and mold to the kayak like you would a sticker.
I found it to be easier to install in the direct sunlight, as the sun heated up the GunnAll Skin it made it a little more flexible and easier to mold to the corner of the kayak. Now here are the pictures, I know thats what you actually want to see!!
I chose to keep the sections 6" wide at the front and back of the kayak as I use those areas of the kayak to help position myself against the structure, therefore they get the most abuse.
6" corners with 3" body
Overall I'm very happy with the installation and look so far. We will see how it fairs in 2 weeks when I try to get into some Tautog action. The prices are still being finalized by Luther at Yakttack and I'm sure will be totally fair, but if you think about proctecting a $3000 investment like a Pro Angler it it worth it regardless! Be on the lookout for more new products being released by Yak Attack this spring. Check out their Facebook Page for a preview of some other new products.
Thanks for reading hope you enjoyed and thank you Luther for the opportunity to test out an awesome new product. Be on the lookout for a Youtube video and PART 2, which will be the actual product testing while fishing.
~MB
DIY Anchor Trolley Installation
So this past weekend I decided to add an anchor trolley to my new Pro Angler. This was the 1st addition I made to the kayak after think it all through for a month or so with numerous outing, which I would suggest for anyone with a new kayak.
This idea I saw somewhere, but I am struggling to remember who/where I got the idea from. It is a very simple project and IMO very cost efficient. First off I purchased 4 "circle eyelet bolts w/ nut"($1.29 each). Sorry I forgot to take pictures before installation, but you'll get the idea soon enough. Next I purchased 2 round rings ($1.69 each). I already had some Paracord lying around the house along with a few zip ties, so I was good to go.
I made 2 separate trolleys one forward and one behind the Pro Angler rails on the top of the kayak. On my last Pro Angler I had the trolley on the side of the kayak, but I decided having it on the top would be easier to work with and water would have less chance of getting in.
I drilled my 4 holes slightly smaller than the diameter of my bolts so I could screw them in snug tight. I was able to attach the nut on all but one of the bolts due to its position in relation to access hatches. For that bolt I just made sure the drill hole was small to make a tight fit. I also added a small amount of Goop to each after the bolts were in place.
I tied the Paracord to Rings and ran it through the eyes and it was all set up. Used it for the first time yesterday anchoring for catfish and it worked like a charm. I would still like to add a quick release cam cleat and a float to my anchor line, so that is next!!
Thanks and maybe this will work for you too..
~MB
Sunday, March 25, 2012
Fishing Report 3/25/12 - Two A Days...
Well I fished a lot today!! Getting in shape for longer fishing days.
Started off the day at 7:45 am on new water I had never paddled before, Mattawoman Creek, MD. In the past few weeks numerous MKF guys have had quality day there with catfish, bass, and crappie so I really wanted to give it a try.
I had not caught a catfish on a kayak since I was about 12 years old as well, so I was really looking forward to the opportunity at maybe a big cat. Don (Shield) and I paddled down the creek to catch up with the birthday boy Ryan (shadyfisher85). He was anchored just off the channel and was using cut mullet as bait. By the time we got there he had already pulled in a nice blue cat.
While waiting for some more catfish I hooked into a chunky little bass. It measured 16.5" but boy was she fat!! Ryan tried to toss me his digital scale, but the toss didn't make it all the way to where I was anchored, so I ended up just letting it go so it wouldn't be out of the water too long.
Didn't catch anything else until about noon as Don and I explored some more of the creek. Also, I lost my go to crankbait. I think I snagged a net because I could see a carcass floating in the water column.
Started off the day at 7:45 am on new water I had never paddled before, Mattawoman Creek, MD. In the past few weeks numerous MKF guys have had quality day there with catfish, bass, and crappie so I really wanted to give it a try.
I had not caught a catfish on a kayak since I was about 12 years old as well, so I was really looking forward to the opportunity at maybe a big cat. Don (Shield) and I paddled down the creek to catch up with the birthday boy Ryan (shadyfisher85). He was anchored just off the channel and was using cut mullet as bait. By the time we got there he had already pulled in a nice blue cat.
I went ahead and anchored across the channel from Ryan and set my lines up with night crawlers. This was my first chance to use my new anchor trolley I put together yesterday. No bites for a little bit so I casted a crankbait at the surrounding structure and land.... After a few casts I hooked up with a few fiesty bass in the 12-14" range.
I then notice a few bites on the catfish lines. I managed I think 5 catfish total (1 blue cat, 3 channel cats, and 1 bull head) I think. The largest was slightly over 18".
Didn't catch anything else until about noon as Don and I explored some more of the creek. Also, I lost my go to crankbait. I think I snagged a net because I could see a carcass floating in the water column.
I then drove home and rested up a little bit. Ate a whole pizza and then I was back at it. Took the yak down to my lake in my community and fished from 3:30pm -7:30pm. Started off bass fishing, but decided I really wanted to try and get a bunch of crappie for Kayak Wars. Ended up catching probably 20+ crappie with 9 being 12" or more. Jig of choice today was a Ravens Combo (Black and Purple).
Thanks ~MB
**CB3 when you gonna tag along and fish from your SUP?
Picture of the Day - 3/25/12 - New Water, More Bass
Fished Mattawoman Creek off the Potamac River in Maryland today for the first time ever. Started off right were I left off with more Bass!! Report will follow later tonight!! ~MB
Saturday, March 24, 2012
Picture of the Day - 3/24/12 - Summer Sailin'
So ready for this summer!!!! This is a cat my roommate and I bought last summer, we used it to teach lessons on near Assateague Island, MD. That's me on the Trapeze!
Friday, March 23, 2012
Fishing Report - 3/23/12 - A Beautiful Crappie Day
What a gourgeous Summer... I mean spring day.. lol I was hot out today!! Got on my lake around 3pm or so without many clouds in sight.
Planned to target Bass all day, but I was getting more Crappie than usual on my Crankbait. Thes crappie we also a lot Darker than the normal White Crappie my lake produces. I'm not sure if they were Black crappie or just darker as I didn't count the spines.
Got 3 dark crappie over 12 inches on the crankbait and only a few small bass on my trip around the loop. I was fishing hard too, trying to work the whole lake as it has warmed up and has become a lot more active everywhere. I caught 3 species on the same rapala crank bait. The blue gill that wer caught were only twice as big as the lure.
At the end of my first loop I hooke into a 16" LMB that found just as hard a dead stick. I carefully reeled in the dead weight, hoping not to lose the KW worthy bass.
Then I decided to practice using my new Bust Em Baits finesse worms. **One of my goals this year is to become more versatile as a fisherman and be able to use more than one approach. I'm very impressed with their baits. And look forward to getting some more use with them before I do a full product review.
I caught 3 out 8 with the worms, still need some practice as I was not letting the bass take it long enough.
I caught a few more crappie so I decided to target crappie exclusively using an UL set up with a 1/8 oz pink jig head paired with a black curly tail jig.
Finished the day with 7 crappie over 12 inches and numerous others under 12" and a mess of blue gill up to 8.5"
Look for another report tomorrow, a fellow MKF yaker will be joining me. Looks like it will be a wet one too. But like I always told my customers while working in the charter boat business, " The fish are already wet."
~MB
Picture of the Day - 3/23/12 - Bust em Up!!
Fished my Bust Em Baits Watermelon 6.25" Finesse Worms today for the first time. I'm working on getting the patience to fish a slow worm. Missed probably 5 bites, but I caught 3 up to about 14 inches. The big boys didn't want to play today.
Check out Bust Em Baits with the link above. They are a great local Maryland company that is also supporting or CBKA Tournament. These baits are quality hand poured plastics!!
Tuesday, March 20, 2012
Picture of the Day 3/20/12 - 51lb White Seabass
This photo is courtesy of Bill Shedd, president of AFTCO, an awesome fishing apparal and technical equipment company. They are a 2012 sponsor for our CBKA Tournament. Check out their website and support a great company!!
Here is the swag they sent us for give for the tournament raffle!!!!
Tight Lined Tales of a Fly Fisherman: TLTFF Giveaway Reminder
Tight Lined Tales of a Fly Fisherman: TLTFF Giveaway Reminder: If you have a blog, Facebook, Twitter, whatever, spread the word! Check it, we're starting off small as far as prizes go for this contes...
Monday, March 19, 2012
Picture of the Day - 3/19/12
This photo is courtesy of Mike S. "Chexone", taken yesterday while fishing the Bay Bridge. Totally living "The Hobie Life" in his new 2012 Revo 11.
~MB
~MB
Rod Building Tips - Guest Blogger "mmanolis2001"
mmanolis2001 is an "elite fish yaker" on our Maryland Kayak Fishing Forum and he was awesome enough to share some of his knowledge with us on the site, so I wanted to share this info with all of my readers as well!! Enjoy!! This was a custom build with the MKF logo!!! Only words that can describe his work is AWESOME!!
For Rod Building Tip Part 1
__________________________________________________________________________________
Basic Thread WeavingI decided to do something special for this site in this writeup. Lets look at the process involved in basic pattern weaving. I am in no way an expert at weaves. I have done several over the years ranging from simple names and initials to single color logos. These types of weaves are the most basic and involve one base wrap thread and single color pattern threads. So what are the base wrap and pattern threads?
The base wrap thread is the base thread that wraps around and up the blank. This is the base in which the pattern threads are weaved in and out of. This thread will be a continuous wrap up the blank. The Pattern threads are the group of threads laying parallel to the blank. The pattern threads can consist of a single color or multi colors (Layers) for more complex color changing weaves.
The weave patterns are also broke up into thread counts for both vertical (base wrap) and Horizontal (Pattern Threads). For example a weave with a thread count of 120 X 60 would have 120 Base wraps around the rod and 60 pattern threads. The base wraps always wrap around the rod and the pattern threads are either moved to the left or right of the pattern. The pattern thread movement to the left or right is dictated by the weave pattern. A pattern thread that is to the right will be hidden under the base wrap and a pattern thread to the left will show up on top of the base wrap. The movement of these threads left and right with the continuous base wrap up the blank creates the weave.
No how do you turn a logo, Name, or image to a weave? There is software around that will convert images into Left lists and label everything nicely. You can also buy patterns from several vendors that do all the dirty work for you. But what if you have a custom logo say the Maryland Kayak Fishing logo? How do we convert this logo into a nice weave on a fishing rod? There is no easy way minus the options I mentioned above. You will have to somehow transpose the image onto a graph and then mark the cells where a pattern thread is present. Every cell containing a pattern thread will become a Left thread. Any space void of a pattern thread will become a Right Thread. So what does the final left list look like?
Here is the full pattern left list I created for the sites logo. Thanks Grilled Sardine for permission to use this artwork.
Lets zoom in and see whats going on in this pattern.
As you see the pattern is broken up into Segments. 1 thru 10 on the horizontal (Base Wrap) and 1 thru 10 on the vertical (Pattern Threads). This numbering continues in the next segment for the 20's, 30's up to the pattern end. This numbering is the thread count of the pattern mentioned earlier. Every Vertical column relates to a full base wrap around the rod. Every horizontal row relates to a single pattern thread. In this example our pattern will be 133 x 60 (133 base wraps and it will contain 60 pattern threads).
Looking closer we can see the pattern threads left and right rules spanning across the weave. These markers will tell us when to move a pattern thread to the left or right.
Now how do we get this on the rod? We need a way to hold 60 horizontal threads parallel to the blank and at the same time keep track of all these threads individually. The answer to this is a weaving loom (Jig). You can buy pre-made looms from vendors ranging form 40 pattern threads to looms that allow you to weave around the whole circumference of the blank.
For the basic weaves I have made a simple loom using scrap wood and some foam strips glued in place. Slits were cut into the foam strips to hold the threads and I marked the thread counts relating to location. As you see not only did I mis count when I originally labeled everything a also reversed on side. This explains the messy and mislabeled loom.
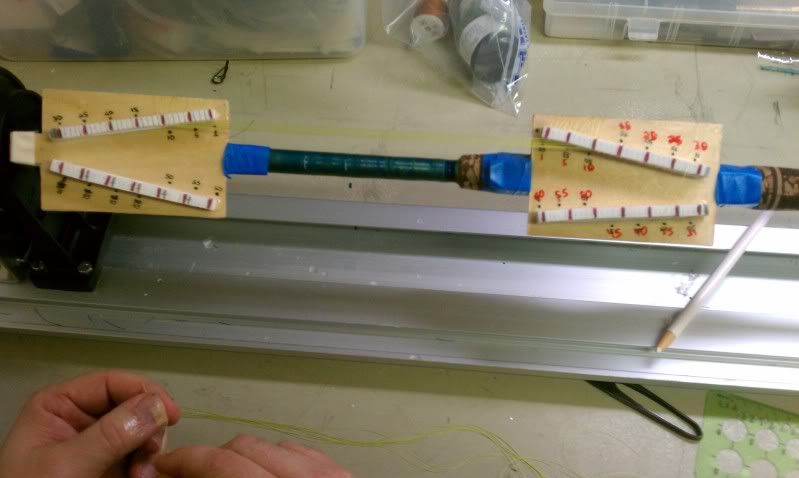
The loom will need to be secured to the blank with tape on either side of the weaves intended location. The pattern thread will be cut to size and inserted into both sides of the loom running parallel to the blank.
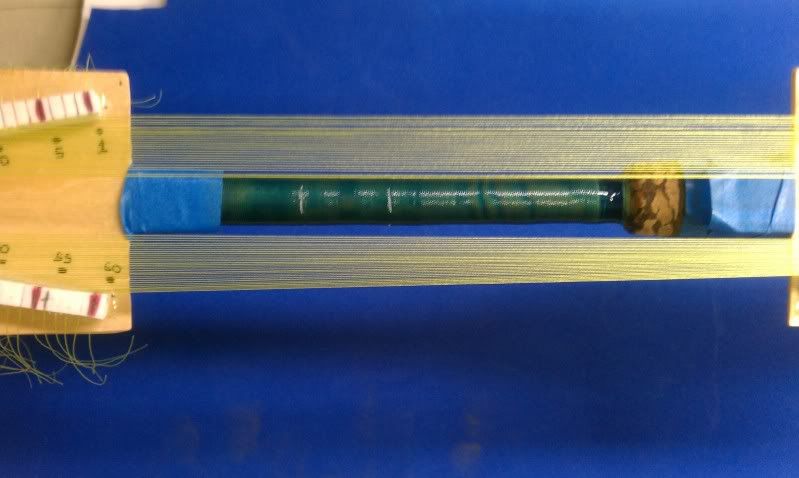
Leave 3 or 4 inches of extra thread hanging off the right side of the loom. You will need this extra thread when snugging down the base wrap.
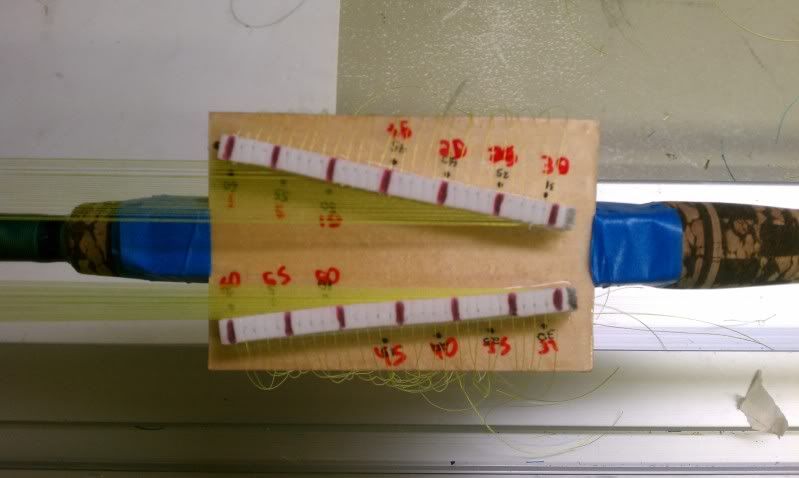
Once you have all the pattern threads setup you will need to start the base wrap on top of the pattern threads. Make several passes and lock the base wrap down.
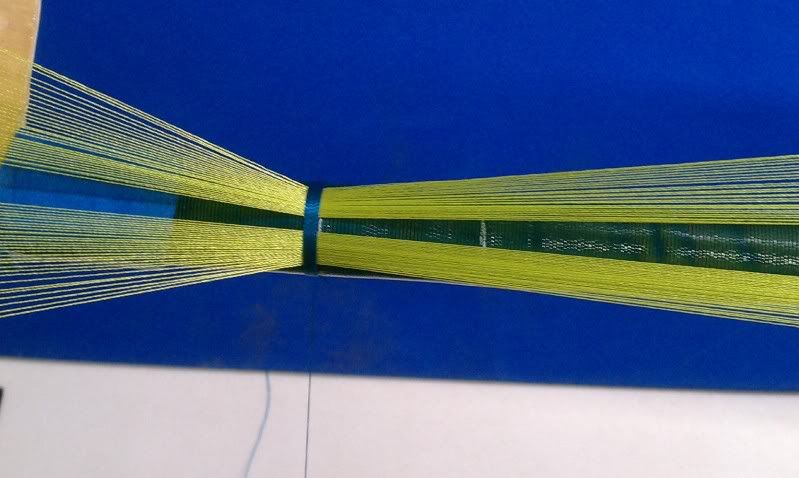
When you have the base wrap secured bunch the pattern threads together. You want them to be as close together at the intersection of the base wrap as possible. Make sure you do not have any threads crossed or overlapping.
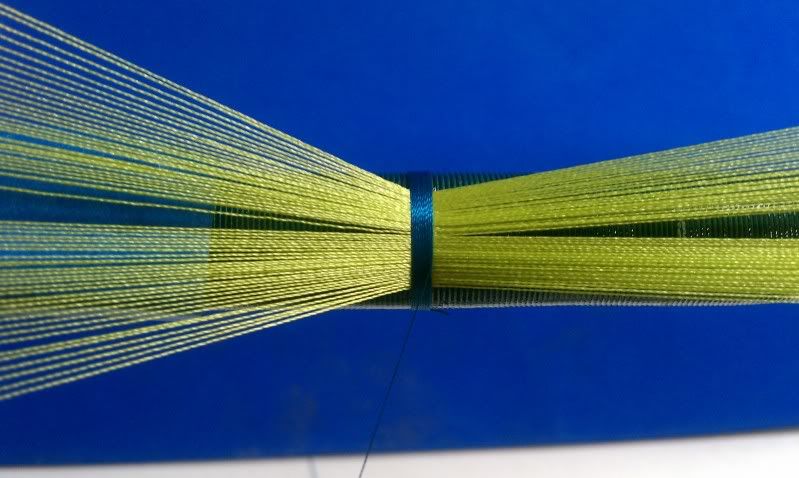
You will now need to trim the left side threads and remove the ends from the left loom. Keep the left side tags coming from under the base wrap several inches long to aid in snugging up the pattern later. Tape the cut threads to the blank to keep them secure and out of the way.
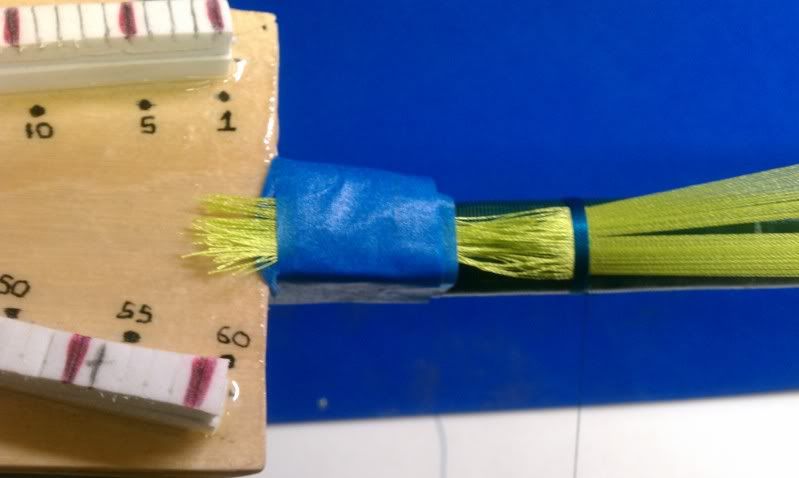
The loom is not setup for the weave.
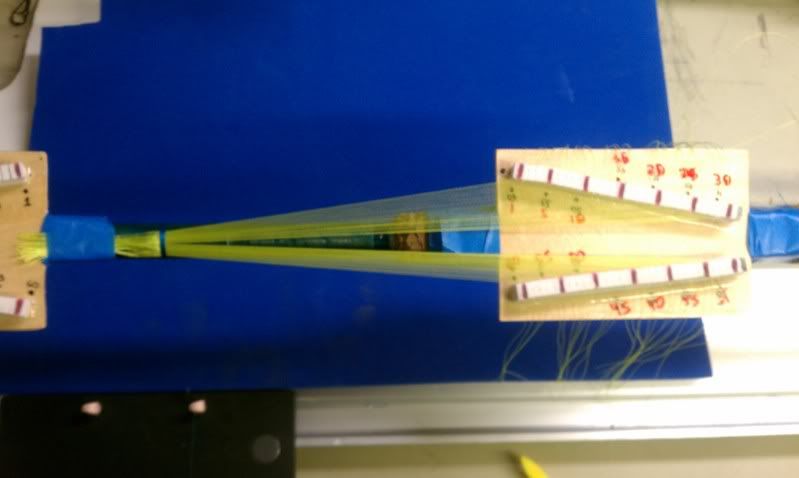
Now its just a process of following the left list for the pattern. Use a ruler to mark completed columns as you go. The most important part of the process is keeping track of where you are in the pattern.
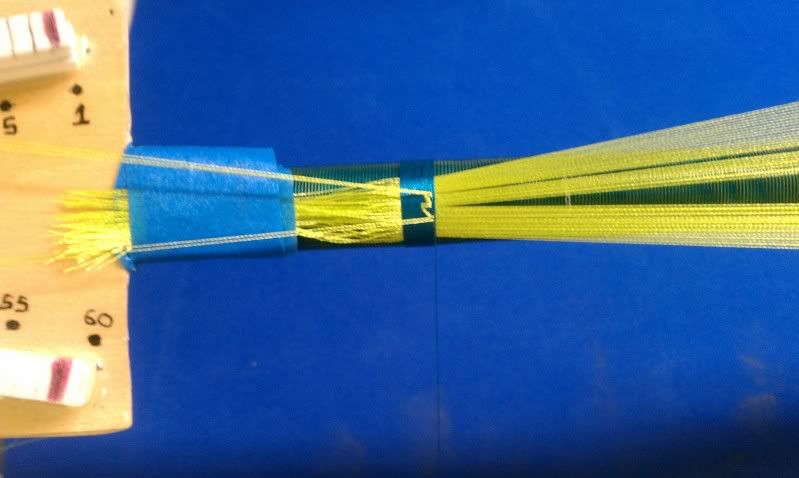
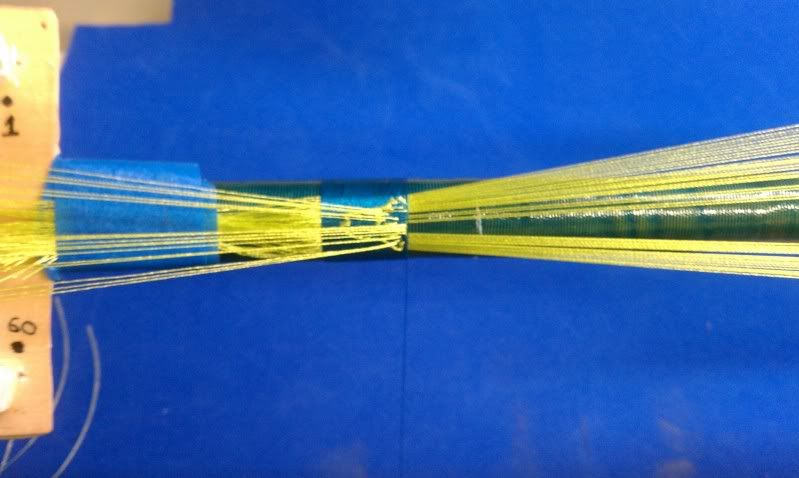
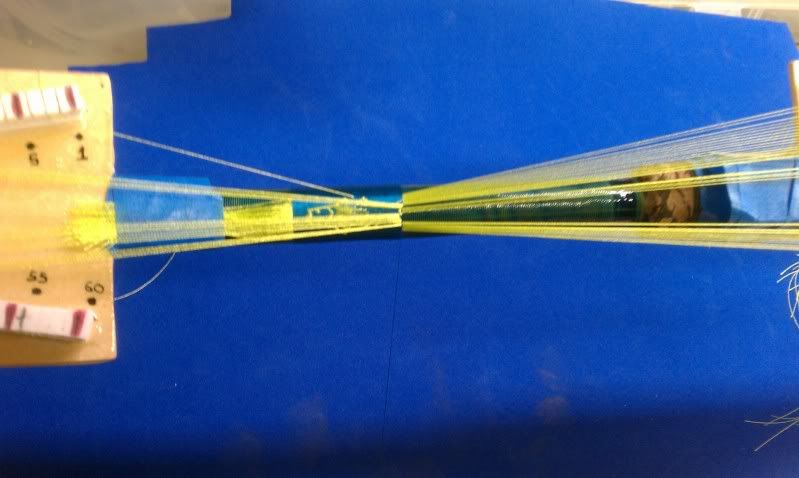
Here is the final product. We left the tags on to allow us to snug up the pattern.
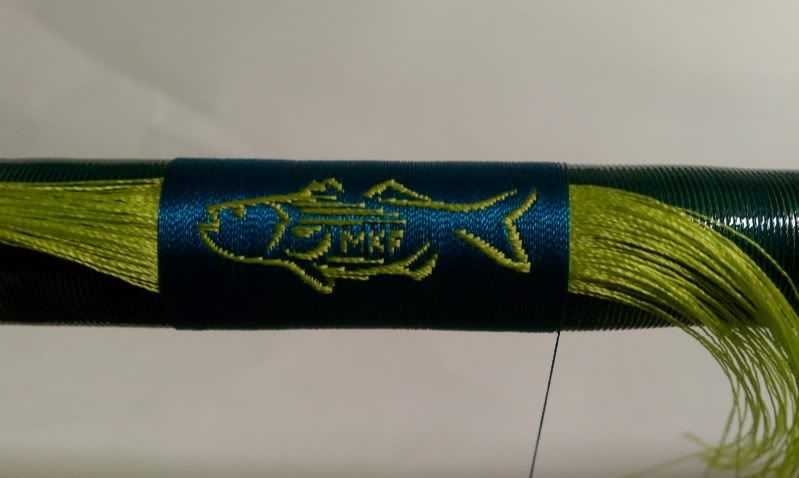
And with some trim rings and everything tidy waiting for a coat of epoxy.
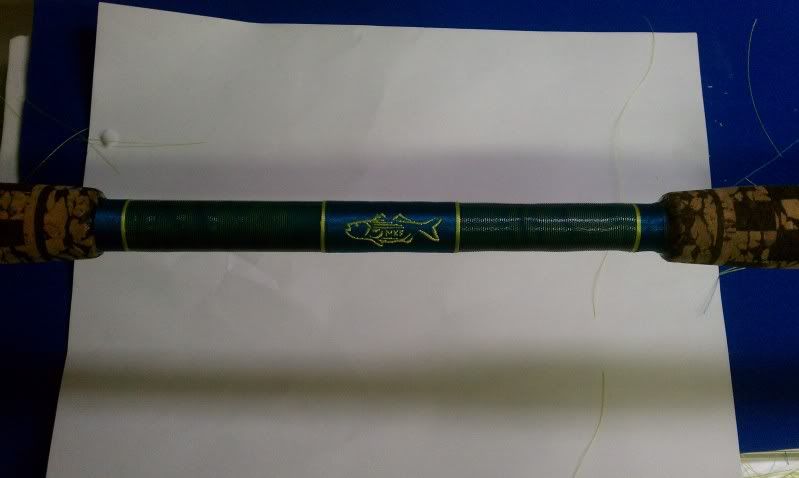
This rod will have some good Mojo with that logo. I cant wait to jig up something.
Hope you enjoyed ~ MB
For Rod Building Tip Part 1
__________________________________________________________________________________
Basic Thread WeavingI decided to do something special for this site in this writeup. Lets look at the process involved in basic pattern weaving. I am in no way an expert at weaves. I have done several over the years ranging from simple names and initials to single color logos. These types of weaves are the most basic and involve one base wrap thread and single color pattern threads. So what are the base wrap and pattern threads?
The base wrap thread is the base thread that wraps around and up the blank. This is the base in which the pattern threads are weaved in and out of. This thread will be a continuous wrap up the blank. The Pattern threads are the group of threads laying parallel to the blank. The pattern threads can consist of a single color or multi colors (Layers) for more complex color changing weaves.
The weave patterns are also broke up into thread counts for both vertical (base wrap) and Horizontal (Pattern Threads). For example a weave with a thread count of 120 X 60 would have 120 Base wraps around the rod and 60 pattern threads. The base wraps always wrap around the rod and the pattern threads are either moved to the left or right of the pattern. The pattern thread movement to the left or right is dictated by the weave pattern. A pattern thread that is to the right will be hidden under the base wrap and a pattern thread to the left will show up on top of the base wrap. The movement of these threads left and right with the continuous base wrap up the blank creates the weave.
No how do you turn a logo, Name, or image to a weave? There is software around that will convert images into Left lists and label everything nicely. You can also buy patterns from several vendors that do all the dirty work for you. But what if you have a custom logo say the Maryland Kayak Fishing logo? How do we convert this logo into a nice weave on a fishing rod? There is no easy way minus the options I mentioned above. You will have to somehow transpose the image onto a graph and then mark the cells where a pattern thread is present. Every cell containing a pattern thread will become a Left thread. Any space void of a pattern thread will become a Right Thread. So what does the final left list look like?
Here is the full pattern left list I created for the sites logo. Thanks Grilled Sardine for permission to use this artwork.
Lets zoom in and see whats going on in this pattern.
As you see the pattern is broken up into Segments. 1 thru 10 on the horizontal (Base Wrap) and 1 thru 10 on the vertical (Pattern Threads). This numbering continues in the next segment for the 20's, 30's up to the pattern end. This numbering is the thread count of the pattern mentioned earlier. Every Vertical column relates to a full base wrap around the rod. Every horizontal row relates to a single pattern thread. In this example our pattern will be 133 x 60 (133 base wraps and it will contain 60 pattern threads).
Looking closer we can see the pattern threads left and right rules spanning across the weave. These markers will tell us when to move a pattern thread to the left or right.
Now how do we get this on the rod? We need a way to hold 60 horizontal threads parallel to the blank and at the same time keep track of all these threads individually. The answer to this is a weaving loom (Jig). You can buy pre-made looms from vendors ranging form 40 pattern threads to looms that allow you to weave around the whole circumference of the blank.
For the basic weaves I have made a simple loom using scrap wood and some foam strips glued in place. Slits were cut into the foam strips to hold the threads and I marked the thread counts relating to location. As you see not only did I mis count when I originally labeled everything a also reversed on side. This explains the messy and mislabeled loom.

The loom will need to be secured to the blank with tape on either side of the weaves intended location. The pattern thread will be cut to size and inserted into both sides of the loom running parallel to the blank.

Leave 3 or 4 inches of extra thread hanging off the right side of the loom. You will need this extra thread when snugging down the base wrap.

Once you have all the pattern threads setup you will need to start the base wrap on top of the pattern threads. Make several passes and lock the base wrap down.

When you have the base wrap secured bunch the pattern threads together. You want them to be as close together at the intersection of the base wrap as possible. Make sure you do not have any threads crossed or overlapping.

You will now need to trim the left side threads and remove the ends from the left loom. Keep the left side tags coming from under the base wrap several inches long to aid in snugging up the pattern later. Tape the cut threads to the blank to keep them secure and out of the way.

The loom is not setup for the weave.

Now its just a process of following the left list for the pattern. Use a ruler to mark completed columns as you go. The most important part of the process is keeping track of where you are in the pattern.


Here is the final product. We left the tags on to allow us to snug up the pattern.

And with some trim rings and everything tidy waiting for a coat of epoxy.

This rod will have some good Mojo with that logo. I cant wait to jig up something.
Hope you enjoyed ~ MB
Friday, March 16, 2012
Picture of the Day - 3/16/12 - First Tautog This Past December
I'm ready to catch a ton of these guys this year!! Upgraded my gear with a Shimano Trevala S and Penn Battle, so I'm ready for some big ones.
~MB
Thursday, March 15, 2012
Fishing Report 3/15/12 - Lake Ridge, MD "A First!!"
I had to get out fishing today since we are having such great weather here in Maryland. It was around 70 degrees today I think, never really checked, I just knew it was nice out!
Hit my lake around 4:15pm and stayed on the water until 7:15pm. Somewhat of a slow start after I caught my 1st fish on my 3rd cast. I didn't catch another fish until about 5:15pm.
All fish were caught on my usual Rapala DT 6 "Baby Bass" pattern crankbait. I also felt like I missed a few bites today, more that normal at least. Most of the misses came after a pause in the retrieve. A fish would hit and just the slightest slack in the line cost me a few fish.
At about 5:30pm I reeled in 16 incher that would count for Kayak Wars!! I was working the outer edge of a large fallen tree top with all the branches still attached. It is the newest structure in my lake as it only fell last summer.
I caught a few small bass in between, but around 6:00pm I caught another one that counts for KW. It measured a solid 17.5 inches and it was a jumper, launching two feet out of the water twice.
Shortly after this fish I watched a LARGE LMB follow my lure back to my kayak through some underwater brush, but like a dumby I got excited instead of slowing down or pausing. Tried to get it to show itself again to no avail.
I also caught a nice bluegill on the same crankbait while bass fishing!!
So here's the 1st for me in my home lake. I snagged what I believe is a herring. Had no idea they were in the lake, but I know they are a natural food for Bass. I thought my bass just ate bluegill and smaller bass as they are usually quite chunky, but I guess there is another food souce for them as well. Now can they just grow faster so I can keep up with the Texas guys in the KBF Challenges!!
***I was informed this is most likely a Golden Shiner***
Thanks for reading!!
~MB
Picture of the Day - 3/15/12 - "Showing Off"
Here is a picture of my college roommate doing a little showing off on his Hobie 14 Turbo!! Blowing by our boss at the sailing/kayak shack in Assateague Island, MD.
~MB
~MB
Wednesday, March 14, 2012
Picture of the Day - 3/14/12
Here is a picture of my Hobie Fishing teammate, Shawn Neurath's pimped out Hobie Pro Angler.
Check out his charter business in the Tampa, Fla area Mission Fishing Kayak Charters!!
Check out his charter business in the Tampa, Fla area Mission Fishing Kayak Charters!!
~MB


